One of the most tedious and repetitive tasks in OpenText Content Server development is the building of a module configuration page. A configuration page is usually linked from the admin.index page, contains a form, and allows an administrator to set the module preferences to their liking. It's a process that involves:
- adding a section in the
admin.indexpage by subclassingAdminIndexCallback(from WebAdmin) and implementing theExecutefunction; - creating an
AdminLLRequestHandlerrequest handler; - implementing the
Executefunction to read the existing preference values (usually from theopentext.inifile,KINItable, or$LLIAPI.SystemDataUtil), or setting defaults if configuring for the first time; - passing the values to the WebLingo file;
- implementing a form in the corresponding WebLingo file that adheres to the style of Content Server;
- populating the form with the values passed down from the
Executefunction; - implementing any special form widgets (e.g., date picker, user picker, node picker, attribute picker, etc.);
- creating a second
AdminLLRequestHandlerrequest handler (often with a "2" suffix) to consume the POST request from the first request handler; - implementing the
SetPrototypefunction in the second request handler to match the form fields defined in the first request handler; - implementing the
Executefunction on the second request handler to validate and persist the values; - showing an unfriendly error message if an error occurs;
- redirecting back to the first request handler (or
admin.index) on completion; and - spending hours debugging and maintaining it.
Bleh.
In the past I created configuration pages by copying the implementation of a similar page and modifying it to my needs. This alone was tedious, error prone, and anytime you copy and paste code you're almost certainly doing something wrong anyway.
What's worse is that adding, removing, or modifying a preference meant editing code in multiple locations and spending lots of time debugging it.
In RHCore I've added an easier way of doing all this, which works without having to write any OScript, HTML, or Javascript. It assumes a collection of form fields to capture preferences such as a boolean, string, integer, long text, user id, group id, node id, category attribute, etc. While this might not be applicable to all implementations, it does cover a common requirement and also serves as a starting point for something more complex.
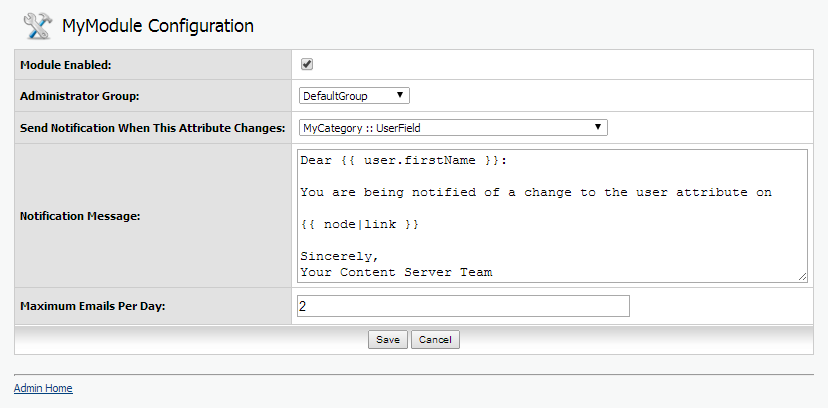
Here's an example of how a configuration page built with RHCore might look:
Let's jump in with an outline of the approach followed by an explanation of the screenshot example.
# Step 1 - Define your Preferences
The first step is to define the configuration preferences you'd like to make available. This is done by subclassing one of the following for each preference. These are located in the RHCore OSpace:
RHPreferenceOTINI- a preference stored in theopentext.inifile;RHPreferenceKINI- a preference stored in theKINItable; orRHPreferenceSystemData- a preference stored with$LLIAPI.SystemDataUtil.
Each preference class has the same programming interface, and only differ by how the preference is persisted. This is transparent to the developer and can be extended if something else is required.
On each preference we implement the following features:
- set
fEnabledtotrue; - set
fNamespaceto something unique (e.g., the name of the module, but the same for all preferences that will be placed on the same configuration page); - set
fDataTypeto the data type of the preference (e.g.,IntegerType,StringType,ListType, etc.); - set
fFormFieldto the form field that will render the preference in the configuration page (e.g.,DateFormField,DTreeFormField,KUAFFormField,IntegerFormField, etc.); - set
fFormFieldWidget(optional) to the form field widget if the default doesn't suffice; - set
fHelpText(optional) to contain helpful text about the preference; - set
fNameto the name of the preference (preferably usingcamelCaseSyntax); - set
fInitialValue(optional) to the default value; - set
fVerboseName(optional) to the label that will be presented in the form (if something pretty can't be inferred from thefNamefeature); - set
fChoices(optional) to a list of choices (if the preference should be selected from a<select>list); and - set
fOrderto an integer for the sort order placement in the form.
# Step 2 - Create the Request Handler
The second step is to create the admin request handler to present, capture, and persist the configuration preferences. This is done by subclassing RHTemplateAdminConfigurationRequestHandler from RHTemplate (which is part of RHCore), which is a generic request handler for configuration pages. Four features need to be implemented:
- set
fEnabledto true; - set
fNamespaceto match thefNamespacevalue used in the preferences defined above; - set
fTitleto a verbose title (e.g., "MyModule Configuration"); and - set
fFuncPrefixto a unique prefix.
Call Build OSpace, SetRequestHandlers, restart Builder, and done. There's no weblingo to implement or OScript to write. The request handler is ready and will:
- set up the configuration form with the existing values (or defaults if running for the first time);
- present the form to the user in a style consistent with Content Server;
- capture the POST request when saving the form;
- validate the form (with user-friendly error messages); and
- persist the form values.
# Step 3 - Create the Section in the admin.index Page
This is done by conventional means by subclassing AdminIndexCallback (from WebAdmin) and implementing it as normal.
# Step 4 - Accessing a Preference from OScript
A developer can access a preference value by calling the valueOf() method on the $RHCore.PreferenceSubsystem subsystem:
Dynamic prefValue = $RHCore.PreferenceSubsystem.valueOf(prgCtx, <namespace>, <name>)
The <namespace> and <name> parameters must match the fNamespace and fName values of the preference being accessed. The return value is cast to the configured data type and will default to fInitialValue if the preference hasn't been explicitly set yet.
# Step 5 - Have a Beer
Rejoice in the time saved. What's great is that adding, removing, or modifying a preference just means creating a new RHPreference* subclass, deleting a preference, or editing a feature on a preference. Nothing else.
# Example
Let's take a closer look at the example in the screenshot above. In the screenshot I showed a configuration page for five preferences:
- a toggle to enable or disable the module (stored as a
Boolean); - a group picker to select the "Administrator Group" for this module (stored as an
Integer); - a category/attribute picker (stored as a
List; i.e.,{CatID,AttrID}); - a text area to set the e-mail message (stored as a long
String); and - a text field to capture the maximum number of e-mails to send per day (stored as a positive
Integer).
The page was created using the steps outlined above, and here is how it looks in Builder (using an 0Setup() script to set the features of the group preference):
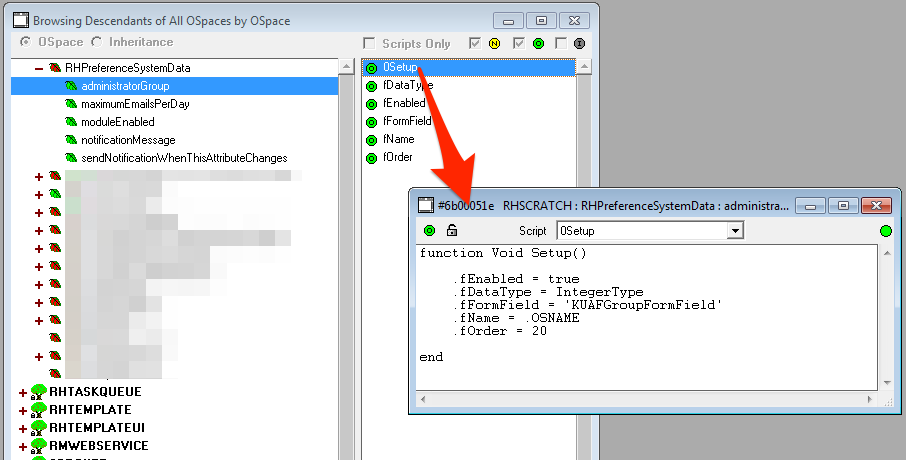
The fNamespace feature appears to be missing, but this was set on the parent such that it gets inherited by all the subclasses (e.g., set to rhdemo).
With this definition we can access the group id preference by calling:
Integer groupid = $RHCore.PreferenceSubsystem.valueOf(prgCtx, "rhdemo", "administratorGroup")
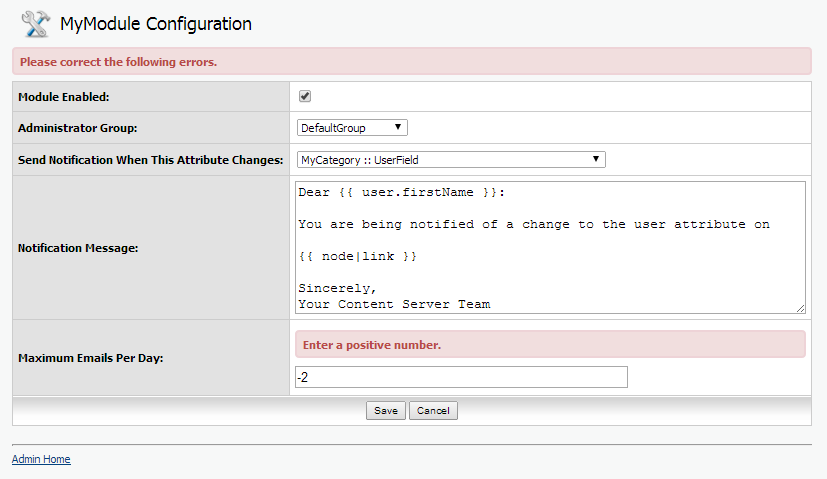
Going back to the form: This is built behind the scenes using RHForm (read about RHForm here), which means we get form validation for free. For example, attempting to save a negative value to the "Maximum Emails Per Day" field results in this:
Preferences can be rendered using any of the widgets provided with RHCore. These "just work" without having to write any extra HTML or Javascript. Widgets include a date picker, date time picker, user picker (standard or with autocomplete), multiuser picker, group picker (depicted above), category/attribute picker (also depicted above), and a few others. I will write more about these widgets in a future blog post.
That's the gist of it. While this blog post outlines the building of a simple configuration page, advanced options and overrides exist to create something more complex when required. What used to take me hours to develop and maintain now takes just a few minutes.
Questions or comments? Please add a comment below or "like" on the LinkedIn post if it brought you here.