HTML forms are a cornerstone of the OpenText Content Server user interface. They are used throughout the system to capture user input and submit the data back to the server.
In part IV of this blog post series I will review how forms are typically managed in Content Server, discuss their limitations, and offer an alternative approach using the RHForm framework. Just to be clear: This post isn't about any of the Content Server form modules (e.g., eForms, Forms, PDF Forms, or Web Forms); I'm referring to standard HTML forms that are embedded in the WebLingo files. You know, these things:
<form method="POST" action="/livelink/livelink.exe">
  ...
  <input type="submit" />
</form>
2
3
4
Forms are deceivingly complex when you consider their full lifecycle. Consider the parts involved:
- setting up the request handlers (usually two);
- fetching any initial data;
- passing the initial data down to the WebLingo;
- rendering the form and the form fields (e.g., input, select, text area, radio buttons, etc.) with its initial data;
- layout of the form (e.g., table, inline, CSS, etc.);
- client-side JavaScript (e.g., client-side validation, date pickers, user pickers, node pickers, autocomplete, etc.);
- server-side validation (e.g., integer fields contain only numbers, required attributes are not blank, custom validation rules, etc.); and
- casting of values (e.g., "1000" to 1000).
Only once a form has passed validation can the form values be used (e.g., saved to a table, execute a LiveReport, initiate a workflow, write to the opentext.ini, etc.).
Content Server accomplishes most form tasks with a brute force programming
Forms are usually tied to a request handler and hardcoded in the associated WebLingo file. Forms are often embedded in a table and styled with some CSS, but also include formatting elements such as "spacer" images, "separator" cells, "thin line" rows, and tables within tables for a shadow effect. Not only does this approach bloat the page, but it makes it difficult to maintain over the hundreds of WebLingo files that have adopted this approach. It's an unfortunate case of copy and paste programming
Forms are closely tied to the data it's rendering and this is hardcoded right in the WebLingo. For example, consider the generation of a select form element to select a group:
<select name="group">
	;for group in groups
		<option value="`group.ID`"
			;if group.ID == selectedValued
				SELECTED
			;end
		>`group.name`</option>
	;end
</select>
2
3
4
5
6
7
8
9
This type of coding ties the form element to the groups variable, limits reusability, and is error-prone since the same pattern is repeated each time a similar form element is required.
Content Server provides some reusable form widgets. A node, user, and date picker are available, but they are clumsy to use and require adapting your form to the precise prerequisites of the widget.
Form validation is one of the weakest components of Content Server, which is surprising since forms are so vital to the user interface. Validation is usually performed by a second request handler (which I refer to as the consuming request handler) prototype, which is a list of rules the request must satisfy. It means duplicating the form field names in the prototype list, setting the expected data types, and flagging each field as mandatory or optional. It does not validate the validity of index values (e.g., a user ID field is actually that of a user) nor provide a callback for custom validation rules (e.g., field A and field B cannot both be blank). These types of rules must be validated directly in the request handler. Worst of all, forms that do not validate return a jarring error page and requires the user to click the browser back button to recover. This can be confusing to the user and may cause them to lose their work. How often have you seen this?

In summary, consider the steps to add a new field to an existing Content Server form:
- fetch the related data in the request handler;
- pass the value down to the WebLingo;
- add the form element and pre-populate it;
- add any related JavaScript (e.g., date picker, autocomplete, etc.);
- modify the consuming request handler prototype to validate the value; and
- modify the consuming request handler to do something with the validated value (write to table, save in opentext.ini, etc.).
This scattered implementation over multiple locations makes the form implementation repetitive, difficult to maintain, have limited reuse, error-prone, and a violation of the don't repeat yourself (DRY) principle
# Introducing RHForm
The RHForm library is a framework for simplifying and managing the form lifecycle, and is an important part of the RHCore framework. It is inspired by the Forms API of the Django Web FrameworkRHForm object, which encapsulates a number of form-related tasks:
- field definitions (including the data type, rendering widget, whether it's required or optional, help text, etc.);
- rendering of the HTML form;
- pre-population of the field values;
- widgets for user, node, and date picking (without additional JavaScript);
- user-friendly form validation and error handling;
- easy methods for accessing the validated form data (cast to the correct data type); and
- tools for managing multi-valued forms.
The framework also changes the form submission pattern typically used in Content Server. Instead of having two request handlers (often named myfunc & myfunc2), everything is encapsulated in a single request handler. This keeps the logic contained and makes user-friendly form validation possible.
# Defining a form
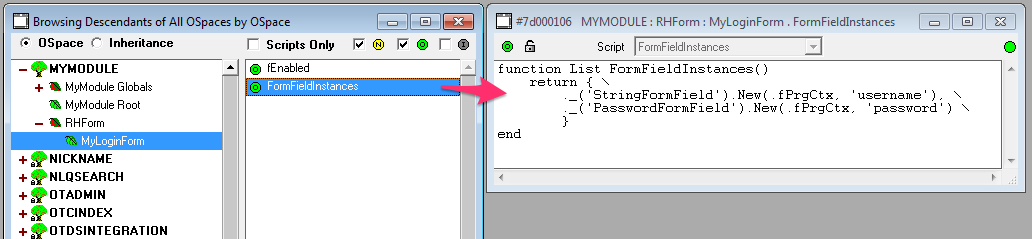
Forms can be defined and created in a number of ways, but the simplest is to subclass the RHForm class and implement the FormFieldInstances() method. This is similar the setting up a model (see
function List FormFieldInstances()
	return { \
		._('StringFormField').New(.fPrgCtx, 'username'), \
		._('PasswordFormField').New(.fPrgCtx, 'password') \
		}
end
2
3
4
5
6
Here is a screenshot:
The form class is added to the global scope with an "RH" prefix (this can be configured). Once defined, a form instance can be created in the request handler with the New() constructor:
Frame loginForm = $RHMyLoginForm.New(prgCtx, request)
The loginForm object contains methods for rendering the form, consuming the POST request, validation, and methods for fine tuning the form behaviour. Let's review and put it together.
# Rendering a form
Form instances can be rendered by using one of the available rendering methods. One such method is the as_table() method, which renders the form in a format suitable for placement in a table. For example, calling loginForm.as_table() returns:

With this the HTML form can be created by passing the loginForm instance to the WebLingo and implementing it like this:
<form method="POST" action="`request.SCRIPT_NAME`">
  <input type="hidden" name="func" value="`request.func`" />
  <table>
    <tbody>
      `%LloginForm.as_table()`
    </tbody>
    <tfoot>
      <tr>
        <td colspan="2">
          <input type="submit" value="Login" />
          <input type="button" value="Cancel" />
        </td>
      </tr>
    </tfoot>
  </table>
</form>
2
3
4
5
6
7
8
9
10
11
12
13
14
15
16
The developer has the freedom to style the form and table however they want, or use the stylesheet included with RHCore for a nice looking default.
# Validating a form
The same request handler used to generate the form is also used to validate the submitted values in the POST request. This is achieved by placing the validation and consuming code in a conditional block that only executes when the request is a POST.
Form validation is performed by calling the isValid() method. This does three things:
- consumes the values of the POST request and saves it to the form;
- validates and casts each field to the correct type, but also sets an error state on any field that fails to validate; and
- returns
trueif all fields are valid,falseotherwise.
This means when isValid() returns true the form values are valid, are cast to their correct type, and are ready to be used for whatever purpose the form was created. The cleanedData() method can then be used to retrieve the validated values. For example:
Frame loginForm = $RHMyLoginForm.New(prgCtx, request)

if $WebLL.WebUtils.IsPostRequest( request ) // only consume POST requests
	if loginForm.isValid()
		String username = loginForm.cleanedData('username')
		String password = loginForm.cleanedData('password')

		// do something with username & password

		// we're done, redirect the browser elsewhere
		.fLocation = ...
	end
end
2
3
4
5
6
7
8
9
10
11
12
13
Here is the cool part: If the form does not validate then isValid() returns false and the redirect does not occur. The request handler continues and renders the WebLingo just as it did before. However, the as_table() method now renders the form with the user-friendly error messages.
For example, the initial login form looks like this (rendered with the rhcore.css stylesheet included with RHCore):

The user inputs their username and clicks the login button:

This submits the form back to the request handler. The isValid() method returns false since the password field is required but was left blank. The request handler continues to execute and renders the WebLingo as before, but now with as_table() including the user-friendly error messages:

You'll also notice the username field value wasn't lost between the requests. The isValid() method saves the POST values to the form such that the subsequent rendering retains the values (including any invalid values).
# Changing the form behaviour
Let's fine tune the form behaviour with some examples.
Suppose it is determined that passwords are optional and can be left blank. The setRequired() method can be used in the field definition to mark a field as optional:
function List FormFieldInstances()
	return { \
		._('StringFormField').New(.fPrgCtx, 'username'), \
		._('PasswordFormField').New(.fPrgCtx, 'password').setRequired(false) \
		}
end
2
3
4
5
6
With everything else being the same, the form will now render the field without the required icon and a more appropriate placeholder:
 Of course, the
 isValid() method will no longer return false if the password field is left blank.
Another example are initial values. Initial values can be assigned to a field with the setInitialValueForKey() method. In our login form we could make "Admin" the default username by calling:
loginForm.setInitialValueForKey("Admin", "username")
More options exist to fine tune how the form and fields should behave. For example, methods can be overridden on the RHForm subclass to permit custom form validation (e.g., the password must be six characters in length, must contain both numbers and letters, etc.).
# Other features
# Integration
The framework is a component of the RHCore framework and is fully compatible with RHTemplate and RHModel. Form definitions can be inferred from your model definition and bound to an instance, which makes it easy to create forms to add and edit model data. I'll detail how this works in a future blog post.
# Widgets
The framework includes a number of form widgets that can be used without having to write any extra JavaScript. This includes the following:
DTreeFormField - a form field that pops up a "TargetBrowse" window to select a Content Server node;
KUAFFormField - a form field that selects a user with autocomplete. For example, replacing our
StringFormFieldin our login form toKUAFFormFieldgives us:
KUAFFormField2 - a traditional Content Server user picker;
DateFormField & DateTimeFormField - form fields with a date picker that respects the system date format as configured on the
admin.indexpage;MultiUserFormField - a form field for rapidly finding and selecting multiple users; and
more!
These widgets have saved me countless hours of coding and are very easy to use. Widgets can also be rendered in an RHTemplate independent of a form instance. For example, to create a date picker with the user's birthday as the initial value:
{{ user.birthday|formfield:"date":"birthdayFieldName" }}
This would produce (assuming the user has a birthday on 29 February 1984):
 Again, no extra JavaScript coding is required for this to work.
# Stylesheet
The rhcore.css stylesheet has a number of stylings to render forms in a Content Server compatible way. Of course, a developer can create their own stylesheet if the rhcore.css defaults don't suffice.
# Complex forms
Forms are often more complex than what has been demonstrated so far. Consider Content Server category & attributes, which contain multi-valued attributes, sets, multi-valued sets, and multi-valued attributes within multi-valued sets. RHForm provides a number of extensions to make complex forms like this possible.
# Generic Admin pages
The forms on most admin pages are quite repetitive. For this I created an RHForm extension for rapidly defining and rendering custom admin configuration pages without having to write any WebLingo. It's reusability at its best.
# Wrapping up
This introduction is only the beginning what's possible with the RHForm framework. I'm using it on a few projects to create complex forms that are easy to generate, validate, and maintain. It has saved me countless weeks of development time to create interfaces that would have been very difficult otherwise.
Want to know more? Add a comment or send me an e-mail at chris@rhouse.ch.